|
|
29 Jun 2021 18:28
|
Ive been meaning to write this blog post for quite some time and have finally had a minute so here goes. In my huge stash are quite a few skeins of really pretty hand dyed yarn, usually merino and nylon blend. However, I dont knit socks and as Im mean only one skein is ever purchased which is not much use for anything. So, I was showing my daughter my stash of hand dyed yarns, this was a few months ago and youve got to do something for entertainment in a pandemic. We found a really pretty skein that I purchased from Hedgerow Yarns and Lucy said she thought that it would suit Isobel, her then 6 month old daughter.
Isobel has a fabulous collection of dresses and skirts she has two older brothers and looks as though shes going to a glamorous party most days. However, all her cardies are long and I thought it would be a great idea to knit a short, fitted cardigan that would show off her skirts to their best advantage. Of course, this meant searching Ravelry for two or three whole days finding lots of maybes, but not a definite pattern. Is this the problem of having too much choice?
Eventually I decided to make up a pattern myself. I knew the size, the style had to be plain so as not to detract from the fabulous skirts and also as a personal thing I dont like too much pattern and a variegated yarn. However, I knew that after my previous cotton disaster, I had to knit in the round and therefore a steek would be in order.
Steeking, if you havent come across this before means cutting your knitting making a tube flat. It is scary but dont be frightened, its most straightforward and almost 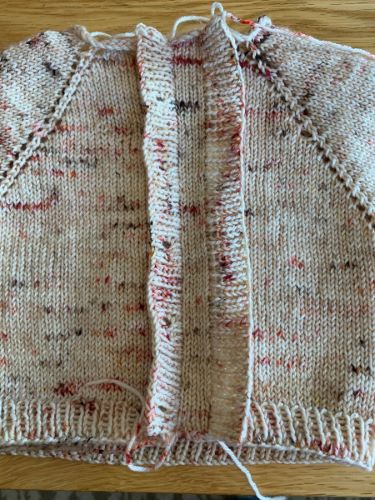 always works. This was going to be slightly more tricky as the merino and nylon blend wont felt which is my usual method of getting the cut edges to stick. So I worked out the size etc and added 8 steek stitches to the total you have to add the extra stitches to cut, otherwise you would be cutting the size down. I cast on top down and used a pretty little eyelet raglan to add a small detail and kept knitting. It didnt take long to knit this up. As always the second sleeve was annoying and in fact both sleeves were annoying as they are so small and its difficult to knit in the round. However ,I used a Chiaogoo fixed needle and all was well. always works. This was going to be slightly more tricky as the merino and nylon blend wont felt which is my usual method of getting the cut edges to stick. So I worked out the size etc and added 8 steek stitches to the total you have to add the extra stitches to cut, otherwise you would be cutting the size down. I cast on top down and used a pretty little eyelet raglan to add a small detail and kept knitting. It didnt take long to knit this up. As always the second sleeve was annoying and in fact both sleeves were annoying as they are so small and its difficult to knit in the round. However ,I used a Chiaogoo fixed needle and all was well.
Now it was time to do the button bands. Some people like to knit the bands on after steeking, but I find that its best to add these before steeking for several reasons: 1. Its easy to pick up stitches. 2. You are not pulling on a cut edge which is a bit risky if you ask me. 3. It makes it really easy to see where to cut. So you will see from the photos the bands being created.
Now for the cut
..Having only left 8 steeking stitches, this gave me four on each side not much in a yarn this thin. I was slightly concerned but went for it. You can see the cut edge in this photo. Many people reinforce their knitting before cutting but I didnt bother as although I was slightly concerned about the yarn, I couldnt work up the energy to get the sewing machine out. Basically if you are going to reinforce your knitting you can do it in one of three ways:
1. Felting This is my preferred method but of course will only work on wool that felts. So, you need a 100% pure wool for this method. To do this, I use a damp cloth and then iron the cut edge until it starts to felt into the main garment. It doesnt take long and is a very reliable method. You can just steam it but I prefer to use the cloth. Dont do this without a damp cloth as it may well go shiny.
2. Crochet You can crochet a row of chain stitch just before the stitch youre going to cut on each side. Obviously you use this method before you make the cut. However, I cannot crochet and so this method is not for me. It is probably the quickest and most reliable, but there, you cant be a master of everything.
3. Sewing I suppose you could h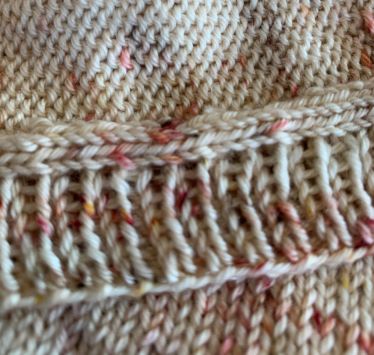 and stitch the edge if you were dedicated, but the best thing is to get the sewing machine out and just run a line of stitches on each side of the stitches youre going to cut. This is a method I have used, if the sewing machine is handy. A zig zag stitch is good as it gives a little stretch. Again, you would use do this before you made the cut. and stitch the edge if you were dedicated, but the best thing is to get the sewing machine out and just run a line of stitches on each side of the stitches youre going to cut. This is a method I have used, if the sewing machine is handy. A zig zag stitch is good as it gives a little stretch. Again, you would use do this before you made the cut.
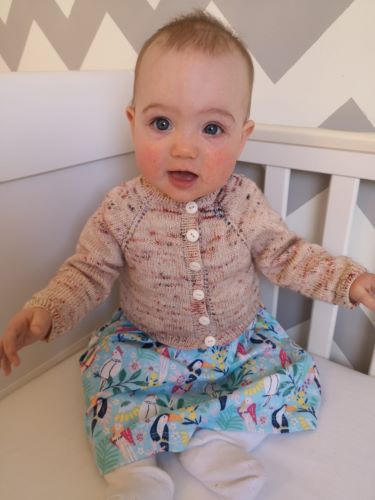
So, I cut the cardigan and was pleased to see that the stitches rolled up a little on each side and didnt come undone when they were pulled gently. I figured as Isobel doesnt move that much it would be safe to leave them. However, the edges needed finishing. You can do this either by cross stitching the edges down, this is a good method if youve felted the edge, or by covering in it some way. I had some pretty pink patterned ribbon and so I painstakingly sewed ribbon bands on each side covering the cut edges. It was a labour of love and I was pleased that it was only a small piece. All I had to do then was sew on some buttons and give it to Isobel, who gratifyingly wore it immediately. Her mother was delighted and hopes that another will be made in a larger size. I do have a pale green variegated which might be just the thing.
|
|
Permalink
|
| 1 Comments
|
|
|
26 May 2021 17:33
|
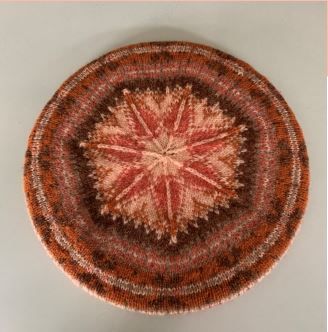
Well, further to the previous post regarding our competition, I'm really pleased to say the tam is finished and it looks great! Here it is

Don't you think the colours look fabulous? The Mimosa really does pop as much as I'd hoped and I like the chocolate/oatmeal combination as it grounds it all a bit. Lucy (daughter) said several times that it looked like those Chocolate Lime boiled sweets she used to eat (When, I never bought boiled sweets?) but once it was finished, she declared it didn't and that she liked the colours a lot. This is great praise indeed. It does still look a bit retro which I'm pleased about as Ian wanted this to be about his mum. Below is a photo of the rest of the tam.
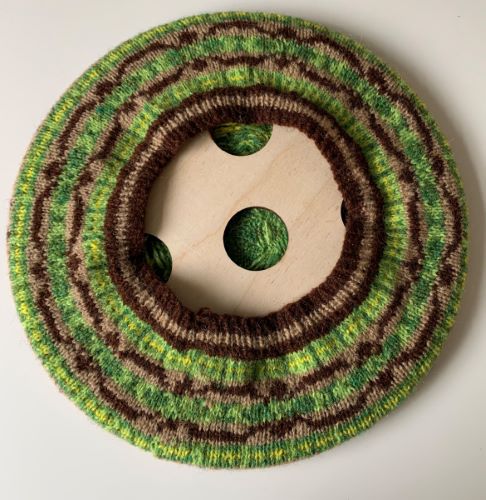
So, Anne - well done! I'm really pleased with the colours and think that you chose well. The contrast between the shades show the patterns clearly and the pop of the Mimosa against the lime is fabulous.
You'll be able to buy the updated kit just as soon as Leprechaun comes back into stock.
|
|
Permalink
|
| 0 Comments
|
|
|
29 Apr 2021 17:33
|
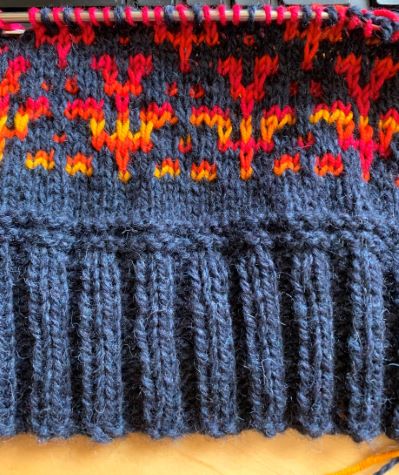
If you are a newsletter subscriber, you will know all about our competition but if not, heres a quick sum up. One of the hats I designed, the MacAlpine Tam,hasnt sold particularly well and my lovely daughter told me that its because the colours are not right. Shes probably correct the colours are a bit too retro for most peoples tastes. I wasnt offended, my husband Ian chose them because they were the colours his mum wore a lot. However this was in the 70s and colour tastes change over time. Not if youre Ian though, he only wears navy, black, white and grey, (but only if its not too light). Thats it. Theres literally no point in mentioning raspberry coloured lambswool sweaters that look so nice on other men of his age. Hes a man of strong colour opinions.
Anyway, moving on, the competition was to design a colourwayfor the hat. Free choice, you could have multiple entries, just five shades of Jamiesons of Shetlands Spindrift. Surprisingly and gratifyingly, we had lots of entries and it was really interesting to read the combinations and guess how good they were going to look.
So, how to grade the colours? This was a bit of a problem and so I took theview that as I used to be a chief examiner for one of the main exam boards, I should use my skills. A spreadsheet was devised with each entry listed in a row with no identifiers. This was used to pick the actual yarn from the warehouse. It didnt matter if a shade was out of stock, my personal stash of Jamiesons Spindrift probably rivals Jamiesons warehouse. I think there was only colour I couldnt match and so used my trusty shade card.
Once the yarn was picked, I photographed each entry and then turned the photograph into a monochrome photo. This is to show the contrast between the shades. This is really important when devising Fair Isle colours. If the contrast isnt right then the hat wont have the proper definition and may well look a bit muddy.
That turned out to be downfall of many entries. Although the colours looked lovely together, there wasnt enough definition between the shades for a small project such as a tam. Many schemes would look great as part of a larger project or with more shades. A few would just need one or two shades changing about to be perfect. However I had to remember that I couldnt change the entries, although it was tempting.
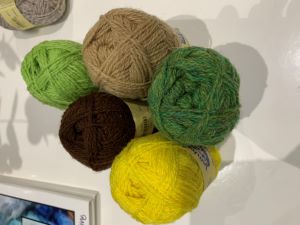 From there it was easy to choose the winner whose entry is shown here. The winner, Anne from Orkneyput together a really fresh and unusual colour combination which has a good pop another essential for choosing Fair Isle shades. Greens are not normally part of my colour palette and so it was good to have a change. I loved the Mimosa pop which is really bright and then Coffee and Oatmeal sets up a good contrast. Im very excited to start the tam. As soon as possible Ill put a photo here. From there it was easy to choose the winner whose entry is shown here. The winner, Anne from Orkneyput together a really fresh and unusual colour combination which has a good pop another essential for choosing Fair Isle shades. Greens are not normally part of my colour palette and so it was good to have a change. I loved the Mimosa pop which is really bright and then Coffee and Oatmeal sets up a good contrast. Im very excited to start the tam. As soon as possible Ill put a photo here.
So, congratulations Anne! Thank you for this. The prize of a £25 gift voucher has been awarded and everyone who entered has been awarded the pattern. Its been really interesting and I hope those who spent time putting colours together enjoyed the process.
|
|
Permalink
|
| 0 Comments
|
|
|
5 Apr 2021 14:40
|
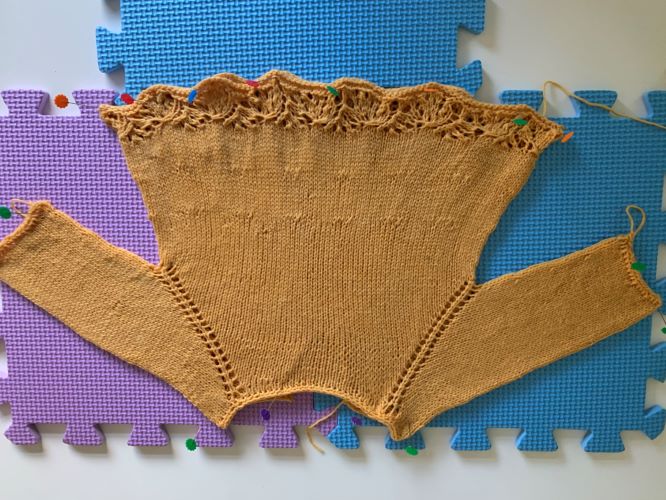
You might remember my cotton top, made for my baby granddaughter, that caused me so many problems. It looked absolutely lovely on Isobel, the pale yellow was a good colour and the fit was excellent, although not much room for growth. Overall, I was quite pleased with it, BUT, my son in law apparently remarked to my daughter that overall the knitting 'wasn't quite up to the usual standard' and that I 'had made quite a few mistakes'. These 'mistakes' were the bars where those wretched increases were made. I wasn't worried by his comments as it wasn't as though I didn't know about them, I was devastated! Not really. However I was determined to make this top again and this time it had to look fabulous.
So, bearing in mind that cotton hadn't worked well for me, I chose a skein of Merino/nylon sock yarn that I had hanging around. I love buying indie dyers sock yarn, but as I never, ever knit socks, it is kind of pointless. Particularly as I'm far too mean to buy several skeins that could work as a project. I only buy one. This could be just the thing for it. This one was dyed by Qing and is the colourway Cove. It's really nice.
This time, I made the 1 year size as Isobel is growing fast. I took the advice of the very talented and expert knitter, Janine, and was more careful with my purling. As she said, cotton is quite unforgiving, and I must say the wool worked better. I used circular needles to do the back/forth rows on both garments and it perhaps that was the problem.. It's hard to tell and I might in time knit another one in cotton to see if I could do better. Anyway, this looked much better but I was concerned about those increases. The pattern instructs you to increase by 'making one' by lifting the bar between the two stitches, twisting and knitting it, but it does leave a little straight bar that is noticeable. After testing this method with the wool, I decided it is noticeable when you do a lot of increases in the row as this pattern demands. So, I read the whole of my Increase/Decrease book and learned masses about the process. However, there wasn't one which suited my immediate needs. Eventually, I hit upon pulling part of the stitch below up to the needle and knitting it - rather like a slip stitch. This worked better for this garment, particularly with the variable colours of the yarn. Here's how it looked:
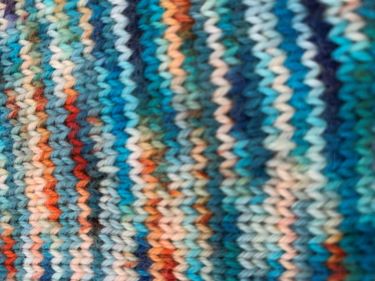
You can see the slipped stitch but it doesn't show as much as the make one. This might be because of the random colours of the yarn, or it might be because this is wool rather than cotton. Anyway, it was more successful for the multiple increases in the row.
I'm really pleased with this and the photo below shows the finished garment. My son in law viewed it yesterday and pronounced it as 'fabulous'. He may have been primed by my daughter to say that. No matter,, I'll take the praise either way.
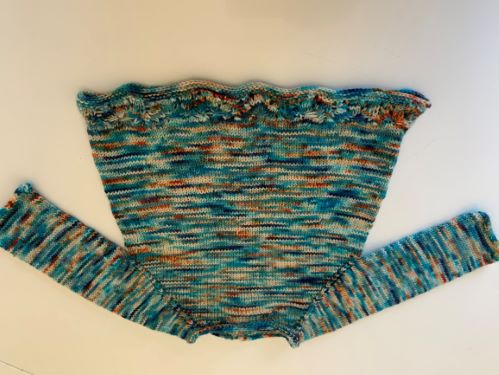
I'm still working on my mosaic sweater and it's coming along well,. However, my next project is a little cardigan for Isobel which will show off the skirts of her collection of fabulous dresses.
|
|
Permalink
|
| 2 Comments
|
|
|
7 Mar 2021 14:21
|
Unusually for me, I've decided to make myself a jumper, which will be the first time in probably 7 or 8 years, if not longer. This is because I don't like knitting for myself, I never look as gorgeous as the amount of effort put in might warrant and as I'm on the larger side, the amount of knitting is immense. However, this particular pattern, Weston Rose by Thea Coleman caught my eye and so I'm having a go.
I chose to use The Fibre Co's Lore because it was DK and I had a pack left over from when we stocked it. We no longer do so, because you didn't seem to like it and never bought it, but let's not get sour about that. Anyway, to be honest, this is the first time I've used it and it really is very nice. I even wondered whether I should stock it again, but then got a hold of myself. The contrast is Wollmeise DK, chosen because they have lovely colours and I just love it. I knit these cowls La vie est belle (Dieppe) by Isabell Kraemer in it. If you are a friend of mine of a certain age with a big birthday looming, don't look at this link - it will spoil the surprise.
Anyway, the patterned bit is created using mosaic knitting. I am familiar with this as I bought the Mosaic Knitting book by Barbara G Walker, which we stock and tried it out. It's great and I would really encourage you to have a go. It's what I call lazy knitting as you repeat two rows with lots of slipped stitches. Very, very simple.
It reminds me of being at infant school and our craft lessons. You had to work through a series of projects one of which was a half cross stitch pincushion, a bookmark in full cross stitch and then a knitted dishcloth in that awful beige cotton. I really didn't like using this and my friend, Caroline finished hers and progressed on to making a felt horse. Oh, how I wanted to make a felt horse. Hers was blue with a yellow mane and I loved it. So, in order to speed things up I hit upon the idea of moving the stitches from one needle to another and not winding the yarn around. Surprisingly it didn't work and sadly I never got to make the horse, but I am now well set up for mosaic knitting. The irony of this story is that I have thought about that wretched horse ever since and mentioned it to Caroline not very long ago. Not only had she completely forgotten she had made the thing, she had been completely unaware of the very big grudge I'd held for the past 50+ years. She's fully aware now though.
Moving this on, all the other mosaic knitting I have done has been on shawls knitted back and forth. This is what it looks like in garter stitch

Basically, you knit with the main colour, which normally changes every two rows, and slip the stitches of the contrast. This is then repeated on the second row. When knitting back and forth, you need to ensure that your yarn is held to the back of the work so that the slipped stitches are 'clean' at the front. However, if you make a mistake with that, it's easily changed on the next row. It looks really attractive and the Barbara Walker book has loads and loads of patterns to try. This is two shades of De Rerum Natura Ulysse Nuit and Ciel if you're interested.
I hadn't really thought about mosaic knitting in the round and when I started was pleasantly surprised that it's even easier as you don't have to worry about holding the yarn at the back when you purl as you don't purl! Also, it doesn't look like garter stitch it looks like stocking stitch and so it's just like Fair Isle, without the effort. Here is a photo of progress so far - it really does look as though it has been knitted 'properly'.
I'm not completely sure the two yarns work perfectly together, possibly the Wollmeise should have been something more woolly, but I liked the colours too much to change it. My only worry now is that it's not going to fit - probably shouldn't eat that KitKat I've got for this afternoon. I will keep you updated with my progress.
|
|
Permalink
|
| 2 Comments
|
|
|
21 Feb 2021 12:39
|
Firstly I would like to say thank you to all of you who commented or emailed giving me hints and tips on how to avoid the uneven stitching. I will reply to you all, but I don't know how at the moment and am waiting for the software people to let me know what to do.
Moving on, I finished the little top yesterday evening and it looked like a limp rag. I meant to take a photo and completely forgot. However, I'm sure you will know what I meant by that. This morning, I soaked the top in tepid water with some wool wash - I use Eucalan which is excellent for delicates and as an added bonus is no rinse - perfect for the lazy. It had a soak for about 30 minutes, mostly because I became distracted into riveting household tasks, putting washing away, cooking lunch and making sure Ian had something useful to do at all times. After soaking, it was rolled in a towel and gently squeezed to remove the excess water. Then blocking. I bought these 'blocking boards' or 'hopscotch' squares from B&Q a couple of years ago and very useful they are. It was then pinned out using dressmaking marking pins because guess what? I couldn't find the 3 packs of KnitPro T Pins that I own. They are by far the best for blocking, but anyway, they are somewhere safe, probably laughing at me.
This is the outcome so far. You can still see the ridge a bit and definitely the marks where the increases took place. I looked at all the finished projects on Ravelry for this pattern and the increase marks on most projects were quite noticeable. However, the unevenness of the top bit, where I picked up the stitches on one sleeve with a large circular to do magic loop and then changed my mind, and some general poor tension in knitting is showing. Maybe when it dries it might even out a bit more, but frankly I'm not hopeful. Still, Isobel isn't a position to complain and frankly nor is her mother, so I'm not too worried about the general state of it.
So, I did enjoy knitting this, but I think a wool might be better. I'm going to get straight onto it. What about the Krea Deluxe Cotton? I liked the feel of it and it knitted well., especially when you take into account I'd unpicked this cotton at least three or four times when knitting a really lacy cardigan during our epic 'Game of Thrones' marathon watch last summer. You can't do both and I used to knit really fast when the gory bits came on - every 3 seconds. The top took almost 2 balls so very good really. I had unpicked both of the balls several times, I was determined not to give up. So, to sum up, I like the pattern and will try it again using something more forgiving of increases etc and I like the cotton and will use it again on something more easy going. I will add a photo of the completely finished article.
|
|
Permalink
|
| 2 Comments
|
|
|
|
|