Ive been meaning to write this blog post for quite some time and have finally had a minute so here goes. In my huge stash are quite a few skeins of really pretty hand dyed yarn, usually merino and nylon blend. However, I dont knit socks and as Im mean only one skein is ever purchased which is not much use for anything. So, I was showing my daughter my stash of hand dyed yarns, this was a few months ago and youve got to do something for entertainment in a pandemic. We found a really pretty skein that I purchased from Hedgerow Yarns and Lucy said she thought that it would suit Isobel, her then 6 month old daughter.
Isobel has a fabulous collection of dresses and skirts she has two older brothers and looks as though shes going to a glamorous party most days. However, all her cardies are long and I thought it would be a great idea to knit a short, fitted cardigan that would show off her skirts to their best advantage. Of course, this meant searching Ravelry for two or three whole days finding lots of maybes, but not a definite pattern. Is this the problem of having too much choice?
Eventually I decided to make up a pattern myself. I knew the size, the style had to be plain so as not to detract from the fabulous skirts and also as a personal thing I dont like too much pattern and a variegated yarn. However, I knew that after my previous cotton disaster, I had to knit in the round and therefore a steek would be in order.
Steeking, if you havent come across this before means cutting your knitting making a tube flat. It is scary but dont be frightened, its most straightforward and almost 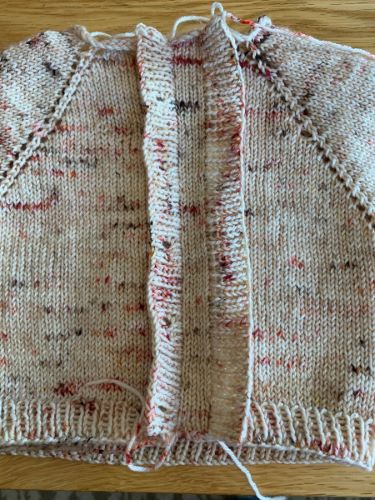 always works. This was going to be slightly more tricky as the merino and nylon blend wont felt which is my usual method of getting the cut edges to stick. So I worked out the size etc and added 8 steek stitches to the total you have to add the extra stitches to cut, otherwise you would be cutting the size down. I cast on top down and used a pretty little eyelet raglan to add a small detail and kept knitting. It didnt take long to knit this up. As always the second sleeve was annoying and in fact both sleeves were annoying as they are so small and its difficult to knit in the round. However ,I used a Chiaogoo fixed needle and all was well. always works. This was going to be slightly more tricky as the merino and nylon blend wont felt which is my usual method of getting the cut edges to stick. So I worked out the size etc and added 8 steek stitches to the total you have to add the extra stitches to cut, otherwise you would be cutting the size down. I cast on top down and used a pretty little eyelet raglan to add a small detail and kept knitting. It didnt take long to knit this up. As always the second sleeve was annoying and in fact both sleeves were annoying as they are so small and its difficult to knit in the round. However ,I used a Chiaogoo fixed needle and all was well.
Now it was time to do the button bands. Some people like to knit the bands on after steeking, but I find that its best to add these before steeking for several reasons: 1. Its easy to pick up stitches. 2. You are not pulling on a cut edge which is a bit risky if you ask me. 3. It makes it really easy to see where to cut. So you will see from the photos the bands being created.
Now for the cut
..Having only left 8 steeking stitches, this gave me four on each side not much in a yarn this thin. I was slightly concerned but went for it. You can see the cut edge in this photo. Many people reinforce their knitting before cutting but I didnt bother as although I was slightly concerned about the yarn, I couldnt work up the energy to get the sewing machine out. Basically if you are going to reinforce your knitting you can do it in one of three ways:
1. Felting This is my preferred method but of course will only work on wool that felts. So, you need a 100% pure wool for this method. To do this, I use a damp cloth and then iron the cut edge until it starts to felt into the main garment. It doesnt take long and is a very reliable method. You can just steam it but I prefer to use the cloth. Dont do this without a damp cloth as it may well go shiny.
2. Crochet You can crochet a row of chain stitch just before the stitch youre going to cut on each side. Obviously you use this method before you make the cut. However, I cannot crochet and so this method is not for me. It is probably the quickest and most reliable, but there, you cant be a master of everything.
3. Sewing I suppose you could h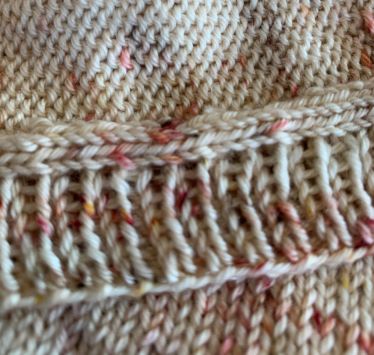 and stitch the edge if you were dedicated, but the best thing is to get the sewing machine out and just run a line of stitches on each side of the stitches youre going to cut. This is a method I have used, if the sewing machine is handy. A zig zag stitch is good as it gives a little stretch. Again, you would use do this before you made the cut. and stitch the edge if you were dedicated, but the best thing is to get the sewing machine out and just run a line of stitches on each side of the stitches youre going to cut. This is a method I have used, if the sewing machine is handy. A zig zag stitch is good as it gives a little stretch. Again, you would use do this before you made the cut.
So, I cut the cardigan and was pleased to see that the stitches rolled up a little on each side and didnt come undone when they were pulled gently. I figured as Isobel doesnt move that much it would be safe to leave them. However, the edges needed finishing. You can do this either by cross stitching the edges down, this is a good method if youve felted the edge, or by covering in it some way. I had some pretty pink patterned ribbon and so I painstakingly sewed ribbon bands on each side covering the cut edges. It was a labour of love and I was pleased that it was only a small piece. All I had to do then was sew on some buttons and give it to Isobel, who gratifyingly wore it immediately. Her mother was delighted and hopes that another will be made in a larger size. I do have a pale green variegated which might be just the thing.

|